


Blind Baking - Part 1
Sweet pastry, rolling, tins and lining.

Before we get going, this post is going to be a multi-parter, there’s just so much information and I want to do it all justice! This post will focus on pastry, how to roll it and lining tart tins, part 2 will focus on different blind baking methods. If you’ve ever struggled with blind baking I’d definitely recommend that you read both posts as the pastry and lining both have a big impact on the final bake.
Blind baking is one of those things that you really need to get to grips with if you do a lot of baking but there are a LOT of pitfalls and a tonne of different techniques, some good, some bad and some straight up confusing. In this post I really wanted to get into every element of blind baking, what can go wrong and why! There is nothing more upsetting than spending hours making pastry, carefully rolling it out, lining your tart and baking it only for it to shrink so much that there’s barely any room for your fillings. In this post we explore what makes the perfect sweet pastry, how to roll it out evenly and possibly most importantly, how to line your tin to prevent shrinkage!
What Is Blind Baking?
Blind baking is baking a pastry case without any filling so that you have a fully baked tart that you can fill as you please. This is generally necessary when you’re making a tart that will be filled with something that doesn’t need to be baked (e.g. a fruit tart with pastry cream), something that needs to be baked at a lower temperature (e.g. lemon tart) or for less time that the pastry would require (e.g. baked chocolate tart). Once you’ve mastered blind baking it really does open up a whole world of opportunities.
The Pastry
Let’s start off with the pastry, the techniques I cover in this post are primarily focused on blind baking with sweet pastry, I use this pastry a lot because it balances workability with flavour and texture perfectly. However you can blind bake with any pastry so to better understand what’s going on let’s take a look at the various factors that make pastry easier or harder to work with.
Fat - fat is normally added in the form of butter, egg yolk or ground nuts. A high fat percentage generally results in a lovely buttery and crumbly pastry, the fat reduces the development of gluten meaning that rather than developing a tough chewy texture, it makes the pastry short and crumbly, this is obviously a good thing! We want our pastry to be melt in the mouth, however it can make the dough quite difficult to work with, in the heat it will get incredibly sticky but if it’s too cold it will be difficult to roll and prone to cracking so it’s really important to get the balance right. Sable pastry (aka pâte sablée) has a wonderful delicate, sandy texture thanks to the high fat percentage while sweet pastry has less fat and is slightly more sturdy.
Liquid - usually added in the form of egg, milk or water, liquid helps to bind all of the ingredients together to form a workable dough, making it more flexible, less prone to cracking and easier to work with. Of course you can always have too much liquid, high percentages of liquid will result in a sticky dough that’s impossible to roll and tough when baked. Unlike fat, liquid activates the gluten in the flour, these glutens shrink when baked meaning that not only will the pastry be tougher but it will also be more prone to shrinkage. I find that for this reason a lot of shortcrust or American pie crust recipes are slightly more difficult to work with as they use water as the liquid rather than egg or milk which contain some fat.
Sugar - of course sugar is used to add sweetness but also affects texture, as it bakes the sugar caramelises giving the pastry a nice golden brown colour and a crisp, crunchy texture, the more sugar, the crunchier and sweeter. Sugar will also change the texture of the unbaked dough, it's hygroscopic meaning that it attracts water so a recipe with a high percentage of sugar will feel wetter and stickier so the more sugar a recipe has the less liquid it will need.
Nuts - although nuts aren’t present in most pastry recipes I wanted to talk about them. Ground nuts can replace a portion of the flour in some recipes, because nuts don’t contain gluten this helps to keep the pastry nice and short as well as adding a nice nutty flavour and slightly coarser texture. They don’t absorb liquid in the same way that flour does so recipes with a high proportion of ground nuts tend to be stickier and more difficult to work with.
Cocoa powder - cocoa powder has an extremely high water absorption rate meaning that recipes that include cocoa powder can be dry and more prone to cracking, although recipes usually account for this by adding additional liquid they also tend to need more sugar to counteract the bitterness of the cocoa. I often find that chocolate pastry recipes are somehow sticky and dry at the same time, sticky when rolling out but prone to cracking when lining the tin - something to look out for!
Onto my favourite sweet pastry recipe. It follows a fairly straight forward crumbing method followed by adding liquid in the form of an egg to make a smooth, pliable dough. This recipe does include ground almonds, I like the texture and flavour that they add but if you want to make it nut free you can just substitute the weight of the almonds for plain flour. This is a really beginner friendly recipe, if you don’t feel confident with blind baking, I’d recommend practicing with this recipe and once you’ve got the hang of it you can blind bake with any pastry your heart desires!
Ingredients
330g plain flour
35g ground almonds
Pinch of salt
100g icing sugar
200g cold butter
50g egg (1 medium egg)
1tsp vanilla extract
Combine the flour, almonds, salt, icing sugar and butter and mix until there are no lumps of butter and the mixture looks like breadcrumbs, do not mix for too long or it will form a huge lump!
Add the egg and vanilla and mix until just combined.
Give it a quick kneed by hand to ensure there aren’t any lumps.
Form into a flat rectangle, this will help when rolling later!
Clingfilm and refrigerate for at least 2 hours or overnight.
Rolling The Pastry
I’m going to keep this short and sweet because really the key to rolling even pastry every time is just practice, practice and more practice. However that is not what anyone wants to hear so here are my top pastry rolling tips!
Roll a small amount of dough at a time, if you’re using the recipe above you can cut it into quarters or thirds before rolling, this makes the dough much more manageable and stops it from getting too warm.
Keep your dough cool, work with dough straight from the fridge, if it gets too warm and starts to stick while you’re rolling it, transfer it to a cutting board or tray and put it back in the fridge to firm up. You can also let it chill for a bit after rolling and before you line the tin to make it a bit easier to work with.
Don’t be scared of flour, a lot of recipes will tell you that if you use too much flour you’ll ruin your dough, while this is somewhat true I definitely recommend using a bit to stop your dough sticking to the bench, just give it a light dusting every now and then and use a pastry brush (or just your hand) to dust off any excess.
Rotate your dough! No matter how hard you try you’ll always end up pushing harder on one side of the rolling pin, to counteract this just rotate the dough after every few rolls, this helps to keep the dough even.
Bash the edges of your dough, on every rotation use your hands or the rolling pin to bash the edges of the dough, this helps to keep it a nice, even shape and stops you from ending up with random tendrils of dough that are unusable and thinner than the rest. If you do find yourself with a bit of a weird shape it’s better to cut those bits off and set them aside for re-rolling.
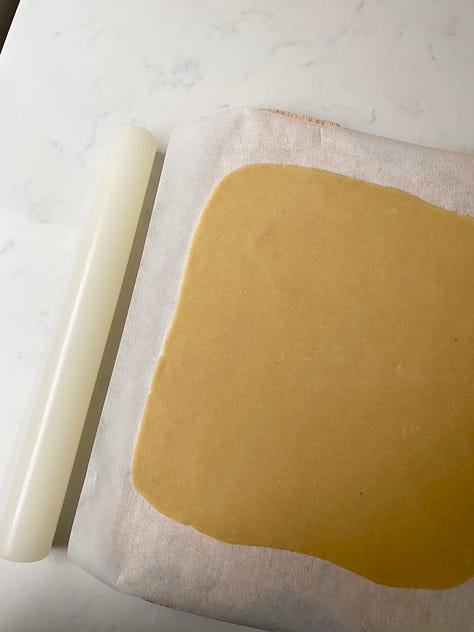
If you’re rolling in a really warm kitchen you can roll the dough between two sheets of greaseproof paper, this is really handy in the summer, roll, chill, remove the paper and then use, this is also a good technique if you’re planning on doing a lot of intricate lattice work, this way it’s easy to put in and out of the fridge as needed.


Traditional Lining & Baking
When it comes to lining tart cases there are a few different methods that you can use depending on the shape of your tart case and the method of blind baking. Some are more complicated than others, we’re going to start with the traditional method, if you’ve ever lined a tart case before this is probably how you’ve done it!
Although this method can be somewhat fiddly it’s definitely your safest bet if you’re making something like a custard tart that has to be re-baked. Because the whole tart is made from one big bit of pastry it means there shouldn’t be any cheeky gaps for the filling to escape out of and the pastry is supported by the tart tin for the entirety of the bake meaning that it’s unlikely to split and leak filling everywhere.
This method works for large, small, medium tins alike and also works well for square and rectangular tins. I find, as a rule, shallower tins with a more obtuse sides are easier to line whist really deep tins with 90 degree angle edges can be a little tricky as you have to work with more pastry in a tight area while at the same time avoiding making any holes or getting a lot of overlap.


The most important thing when lining a tart this way is to get right into the corners, if there’s any space, as soon as that pastry gets into the oven it’ll slump to fill it and you’ll end up with a lot of shrinkage. So let’s get into how we do that:
Lightly grease your tin/tins.
Start by cutting a circle 1-2cm larger than the circumference of the top of the tart tin*, the deeper the tin, the larger the pastry need to be.
Lift the disc into the tin, if you’re using a large tin you can roll it up on a rolling pin first to avoid any breakage.
Gently lift the sides of the pastry so that all of it is inside the tin and nudge it into the base, we don’t want to be smashing it into the tin at this point, just gently nudging it into position, the slower you take it at this stage the less likely it’ll be that all you pastry gets bunched up. If you realise you have way too much pastry you can use scissors to snip off any excess, don’t get too scissor happy, you still want about 1cm overhang!
IF LINING MINI TARTS SKIP TO STEP 9.
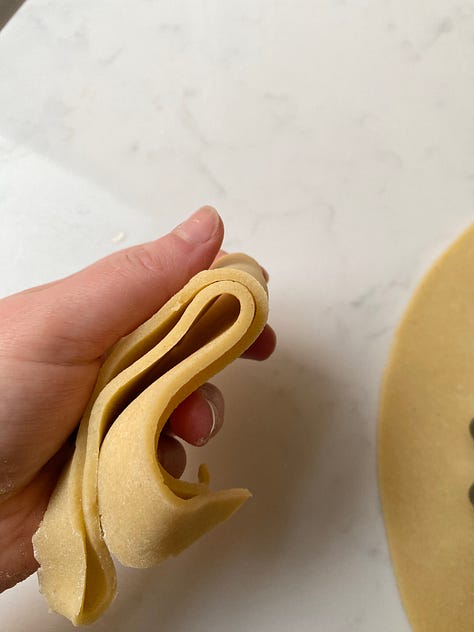
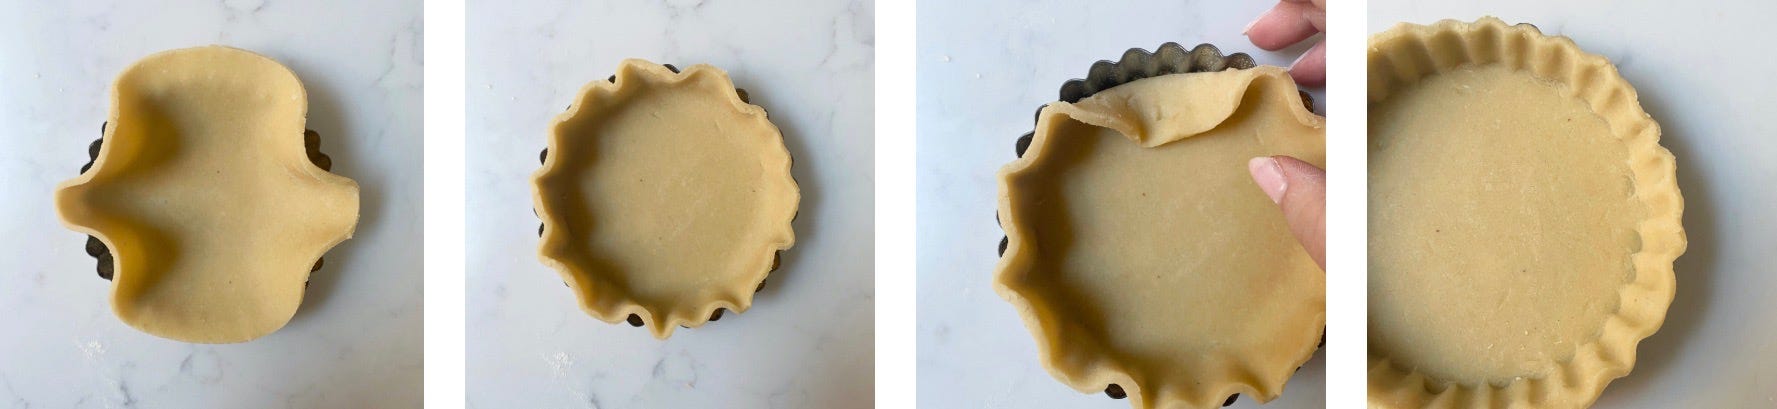
At this point it should be in the tin with no overlaps and looking something like image 2 (see below). Now is when we’re going to focus on getting it right into every single nook and crevice. I do this by slightly folding a small section of the pastry over towards the centre of the tin and gently pressing the pastry right into the corner.
If you have some areas where the pastry has concertinaed or overlapped and you can’t straighten it out, don’t worry! Just try to press it gently so that it’s approximately the same width as the rest of the pastry, once it’s baked you won’t be able to notice.
Unfold it and press it back against the edge of the tart tin and move onto the next section, continue until you’ve been all of the way around and you can see that the pastry is right in the corners.
If you’re using a fluted tart tin this is where we get the chopsticks out! Gently push a chopstick into each crevice, or just use your finger depending on the size of your tin and fingers!
If you’ve accidentally made any holes just use a bit of pastry to block them up, you won’t be able to notice by the time it’s baked!
Your tin is now fully lined! Trim the excess or leave it (more on this later) and chill until ready to bake. This gives the gluten time to relax and means that when we come to blind baking the pastry will be nice and firm and won’t be destroyed by the parchment paper.
*If you want a shallower tart you can get away with cutting your pastry smaller and not having any overhang, you just need to make sure that you place the pastry right in the centre of the tin!
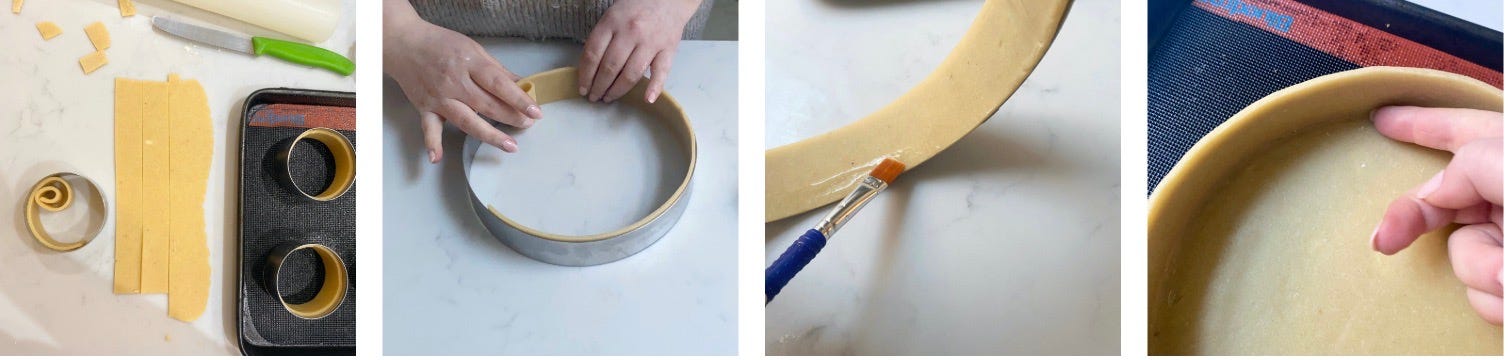
Straight Edge Tins
Now onto lining tart rings or straight edge tins or even cake tins. You can use the method above but it can be incredibly difficult to get the pastry right into the corners, especially if you’re lining, small, deep rings, rather than struggle with it I like to line these by using the following method:
Lightly grease your ring/rings.
First figure out the circumference of your tart ring, I just do this by using a piece of string and a ruler.
Roll the pastry to your desired thickness.
Use the tart ring to cut a disc of pastry and set aside.
Using a ruler, cut strips of pastry, measuring to make sure you have enough plus a bit extra for the circumference of your ring/rings.
Gently press the strip of pastry into the ring, when it comes to joins, press down on the edge of the pastry, brush a little water over it and cover with the adjoining strip of pastry allowing a couple of millimetres overlap. Press down to ensure that it is fully stuck together and an even thickness and continue, the less overlaps the better but some are inevitable especially when making a large tart.
Chill the lined ring and disc of pastry before continuing, this gives the pastry a chance to firm up before adding the discs which means we’ll be less likely to mangle it in the process of adding the base.
Once everything is chilled, paint the base of the tart ring with a little water, this helps the pastry to adhere meaning that once it’s baked the bottom won’t just fall out!
Place the lined ring onto a tray lined with parchment or reusable baking mat.
Press the pastry disc into the ring, gently nudging the edge of the disc to create a slight overlap with the pastry on the sides. Use a small spoon or the back of your nail to meld the two together.
Chill before baking.
That’s all for now! Come back for part 2 to learn about different blind baking techniques, when to use them and why and how to fix any tart cases that might have gone wrong!
Thank you so much for reading, if you have any questions or if there’s anything you’d like me to include in part 2 (and maybe 3) just leave me a comment 💗

hi, how much pastry does the recipe included here make? would I need to half it for an 8" pan? thank you!
Any tips on getting them out would also be appreciated. Im catching on that if under cooked its a no-go.