Éclair Exploration
Tips and tricks to getting the perfect éclairs

Hello and thank you for being here! If you like what I do please consider becoming a paid subscriber! You’ll receive an exclusive recipe every week and you’ll get access to the full archive which includes a tonne of thoroughly tested cake and dessert recipes and you’ll be helping to support me 🩷. To become a subscriber or upgrade your subscription hit the button below and join me for more cakey fun!
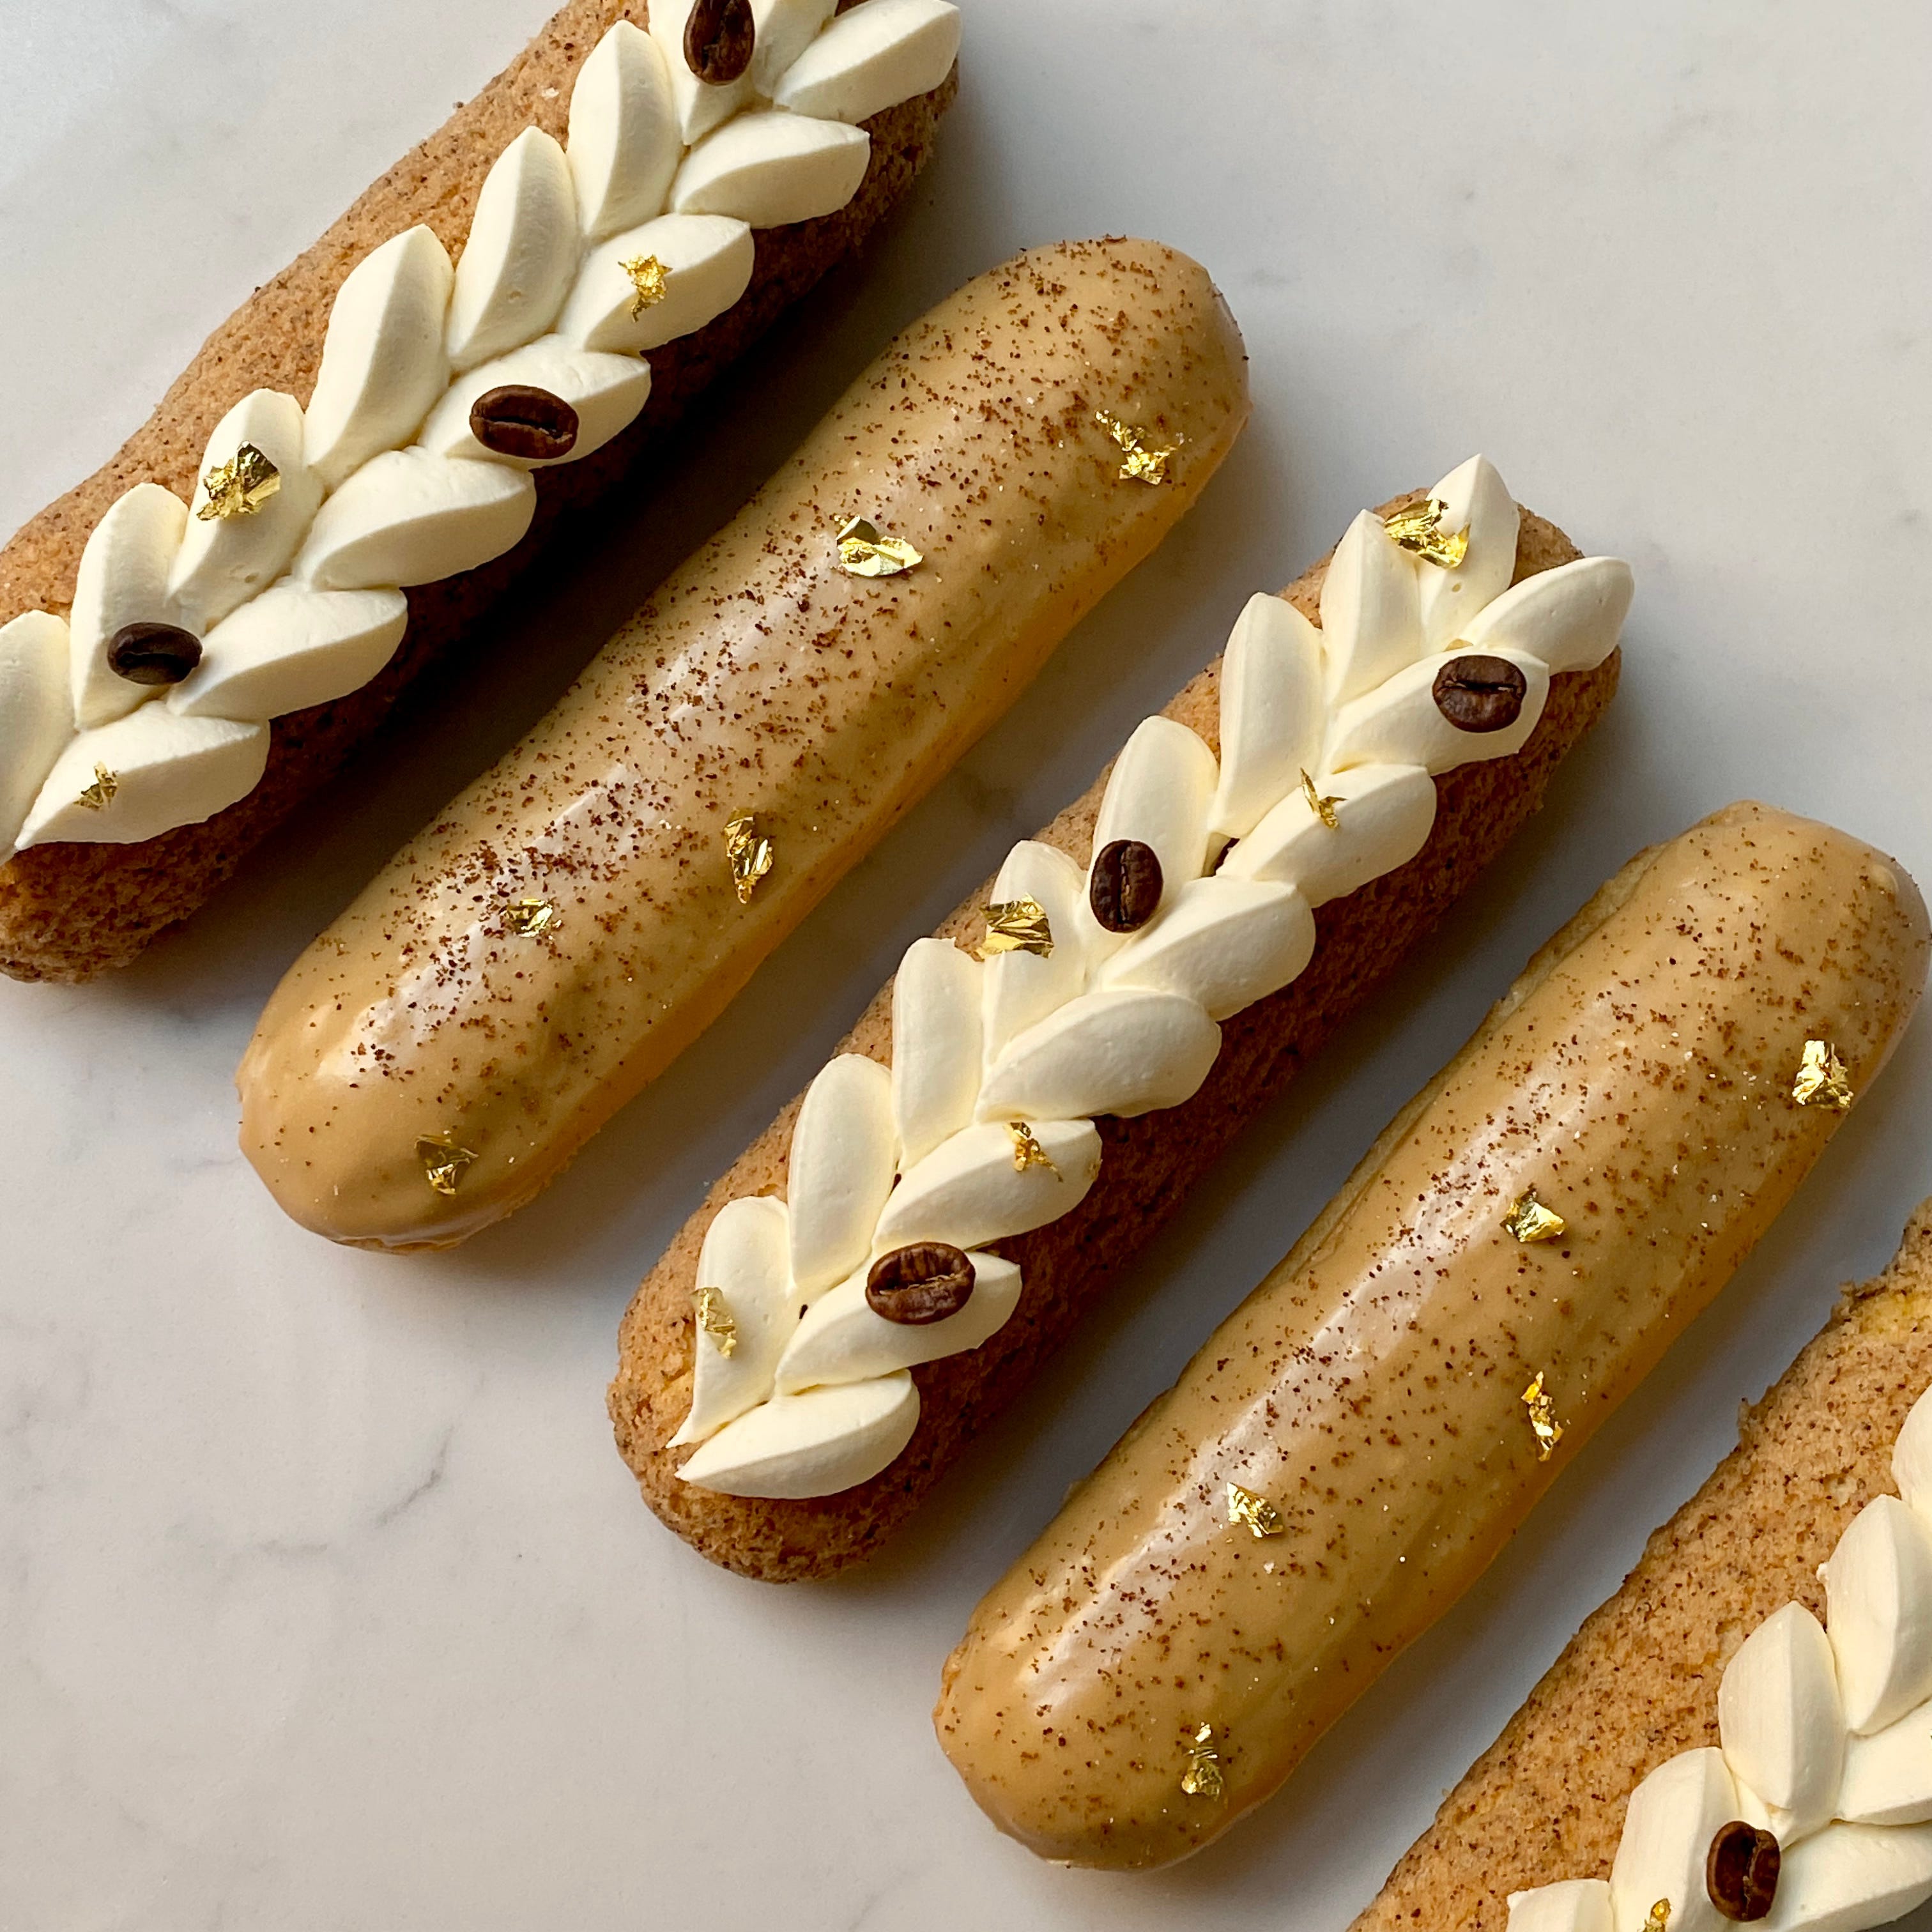
Hello! This week we’re chatting all about éclairs. Out of all of the choux pastry products I think that éclairs are the hardest to get right, they seem so simple but that’s what makes them tricky, there’s nowhere to hide, if you’ve piped a dodgy shape it’s going to be obvious, if it puffs up wonky, you can tell, if your filling is too runny it’s gonna squirt out all over the place. And that’s just to name a few.
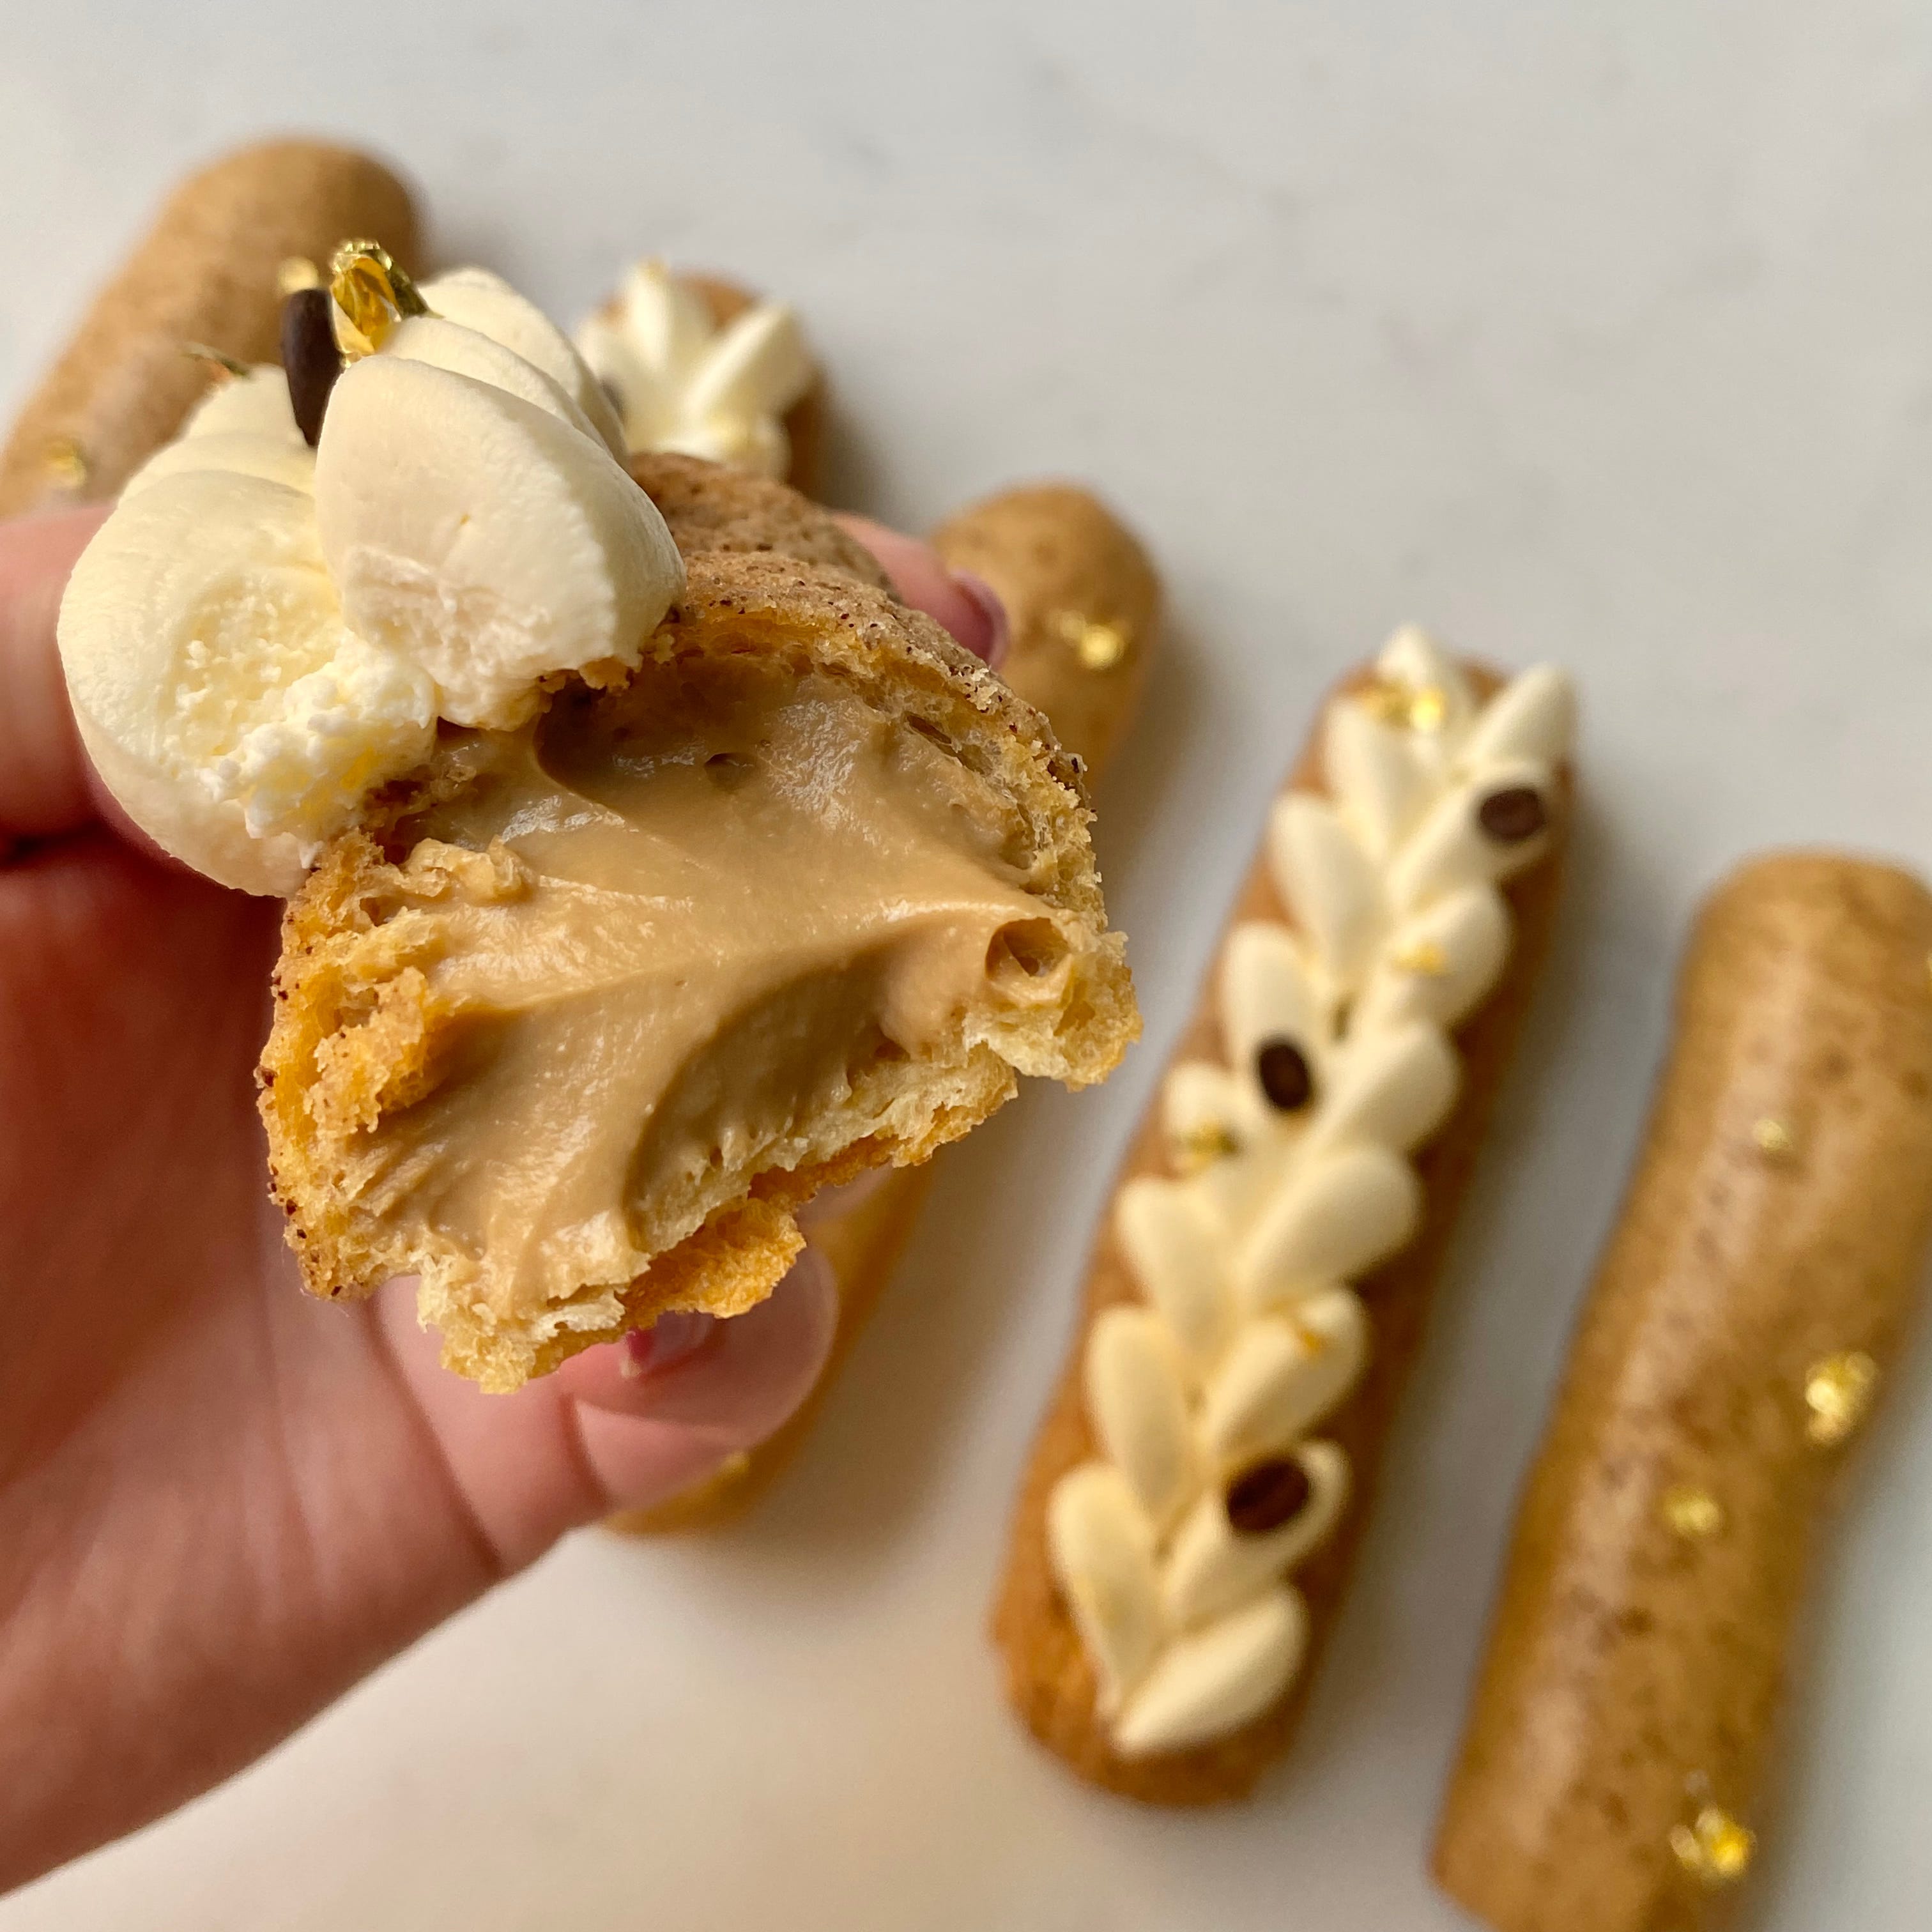
This week I’m going to chat about all of the tips and tricks I’ve ever encountered, talk through them and share my favourite, along with a choux pastry recipe. For paid subscribers I’ve got a recipe for classic coffee éclairs with a fondant glaze as well as some tiramisu inspired ones, a choose your own adventure of sorts.
In many of my previous jobs I’ve battled with éclairs, we’ve had ups, downs, and full on meltdowns (at one point I just told my boss that I refused to make them anymore). I don’t want anyone else to hate éclairs as much as I did so I’ve complied everything I’ve ever learnt! I’m including my choux recipe on this post but all of the methods I’ve included will work with any recipe! If you’re not in the mood for éclairs, I’ve got loads of tips and tricks for piping choux buns on my Courtesan au Chocolat post.
Choux
First up let’s tackle the choux, like I said all of these techniques will work with any recipe but there are a few things to keep in mind:
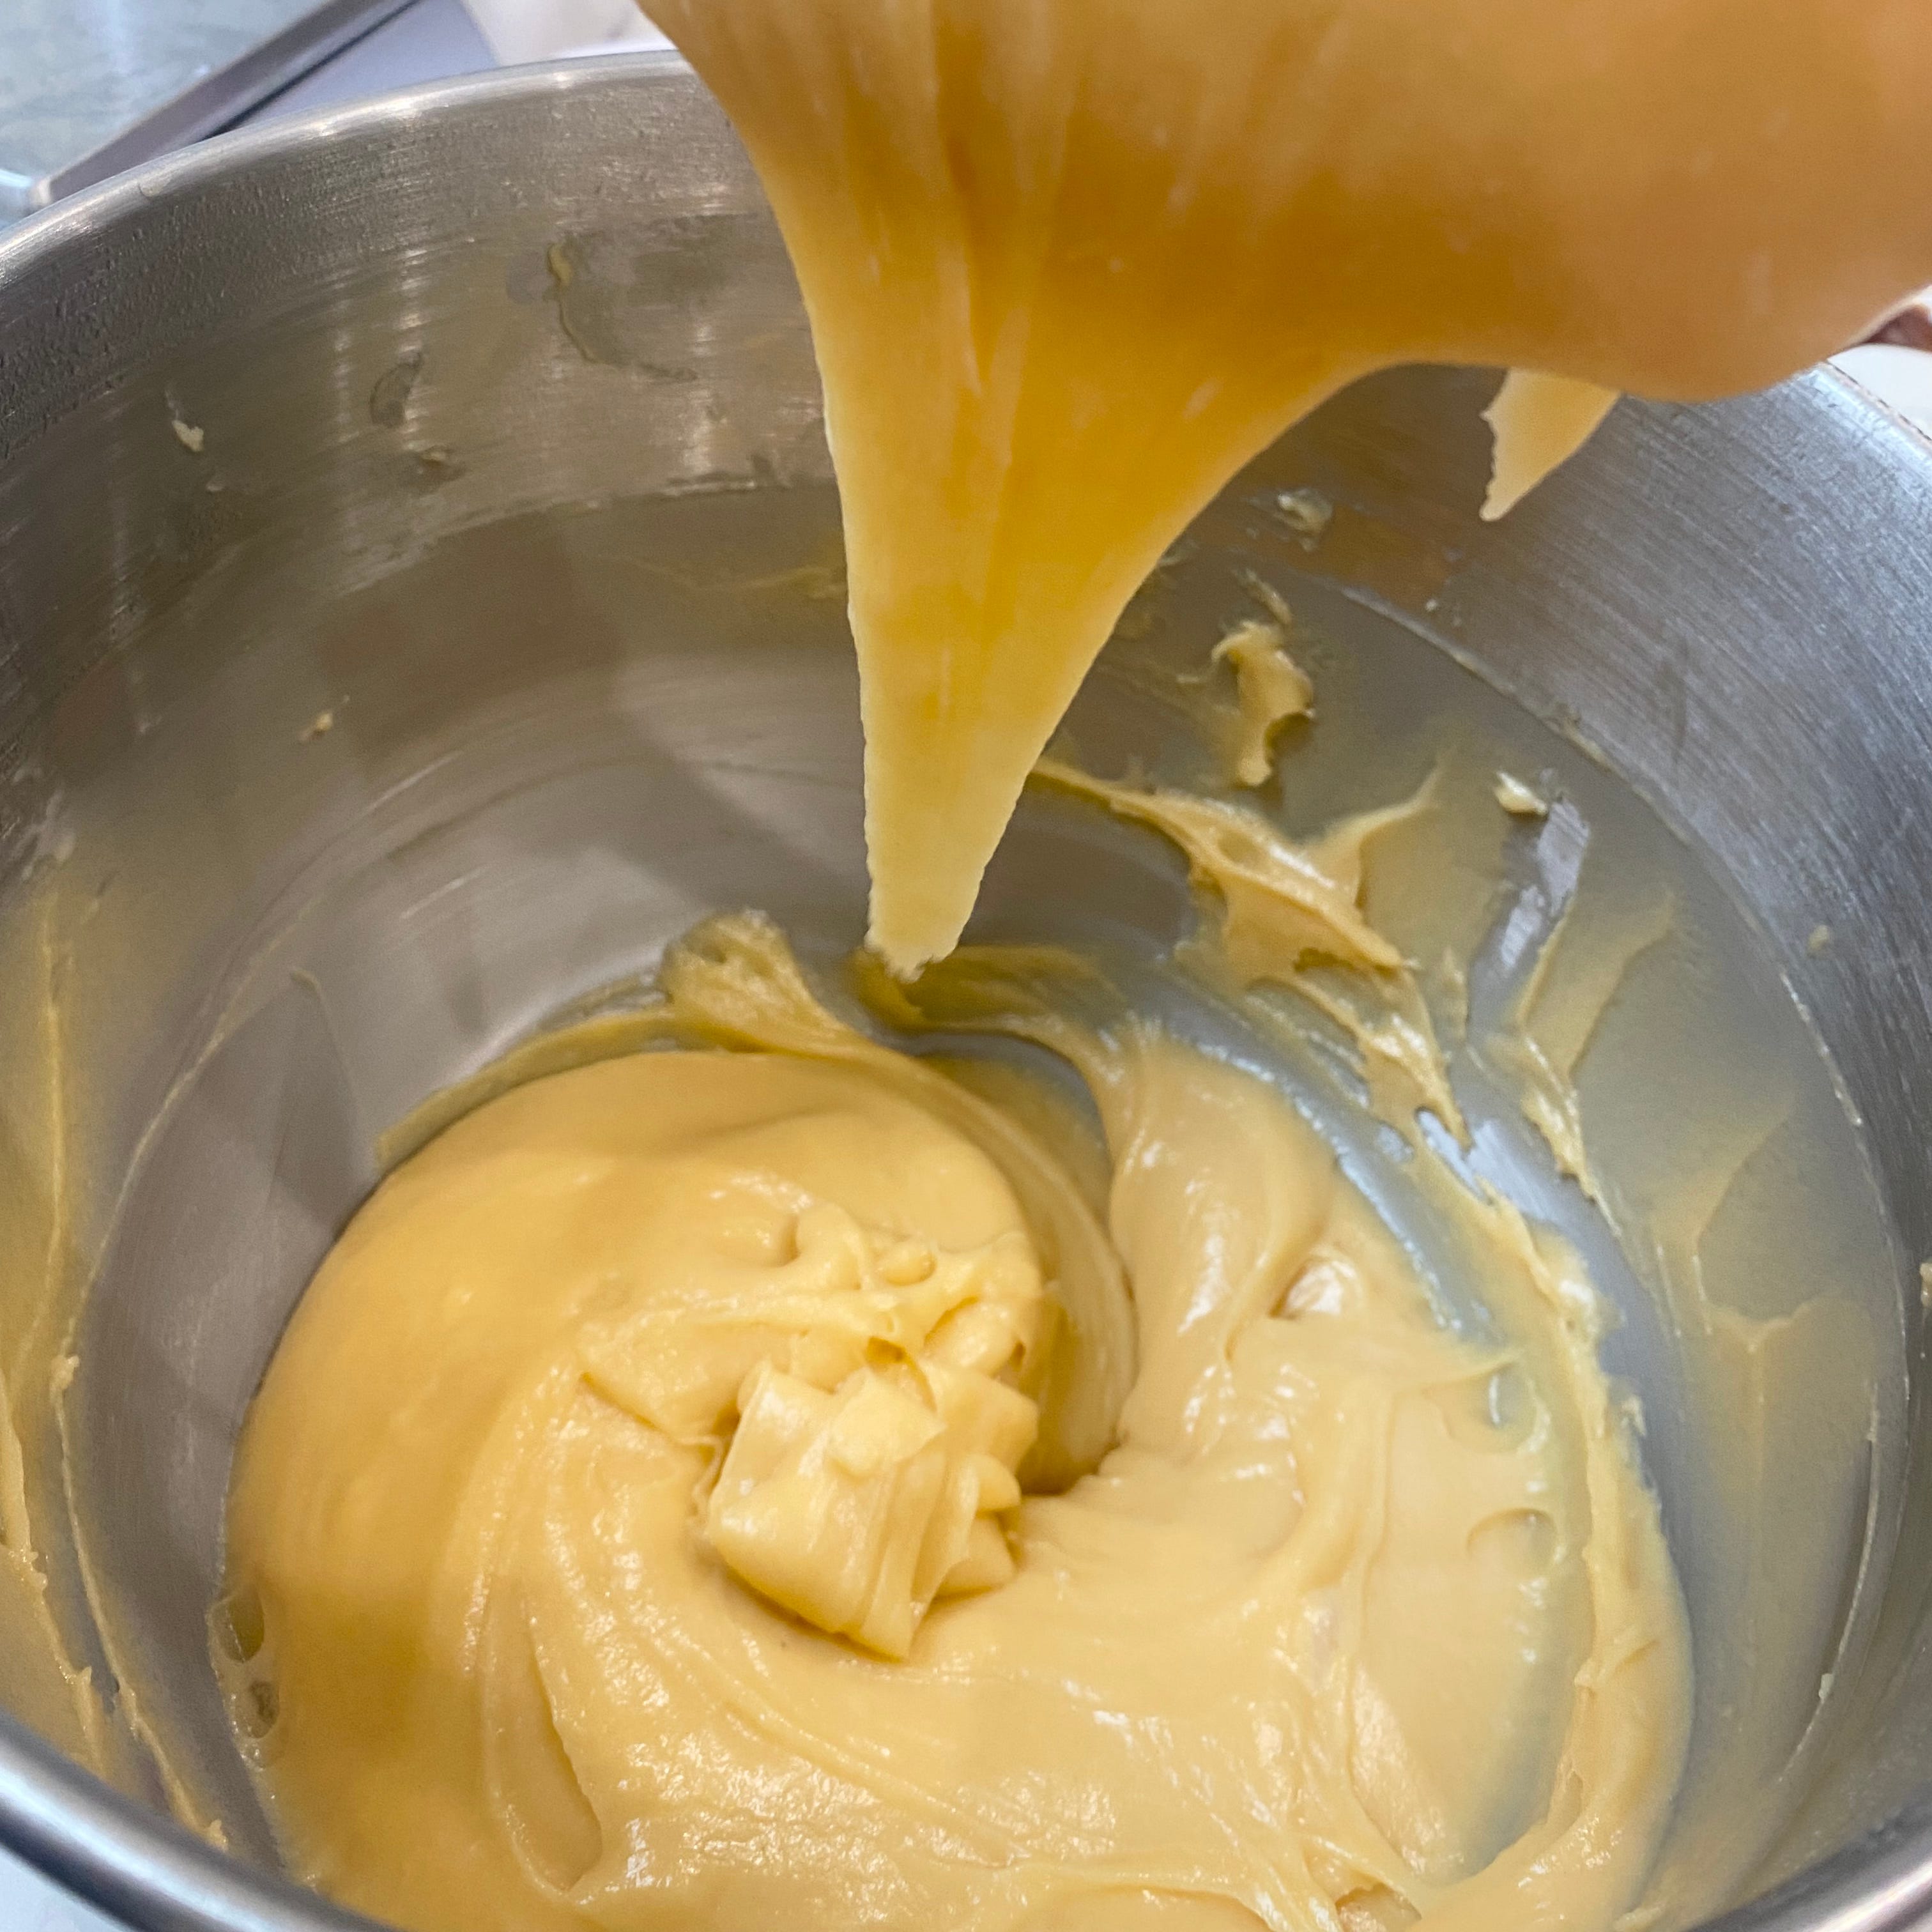
Avoid adding air bubbles: When piping éclairs the main thing that we want is for there to be as few air bubbles as possible, any air bubbles are going to mess with our piping and therefore the final shape of our éclair. So when adding the eggs to the choux pastry it’s important to incorporate as little air as possible. If you’re using a stand mixer, mix on a low speed, if you’re mixing by hand use a spatula or wooden spoon rather than a whisk.
Don’t add too much egg: We need egg to make our choux pastry puff up, eggs make steam which makes the choux puff meaning that we can fill it with lots of lovely fillings. However, when it comes to éclairs I tend to add slightly less egg, this gives the choux pastry a more controlled rise so that it’s not just puffing up all over the place. Usually when it comes to recipes for patisserie it’s a science and the measurements must be followed exactly however when it comes to choux I always add the eggs by eye, you want it so it *just* drops off the spoon and forms a v shape, it shouldn’t be running off the spoon or a pourable consistency. Just add a little bit of egg at a time, once it’s in there you can’t take it away. If you have added too much egg I’d recommend turning the choux into savoury gougères, it doesn’t really matter what they look like and they’ll still be delicious!
Chill it: I don’t see many people recommend this but I like to chill my choux pastry in the fridge before piping. I always seem to get less air bubbles in my piping bag, it’s a firmer consistency after chilling which I find easier to pipe and it holds its shape better! I prefer to chill it overnight but even an hour in the fridge helps with the consistency.
Piping
The problem with éclairs is that the piping really does matter, there isn’t any way around it, the more even the piping the better the final product. This may sound scary but there are a few things we can do to get our piping as even as possible (aside from practice):
Nozzles: The nozzle I use will depend on if I’m using craquelin or not (more on this in a bit). If I’m not using craquelin I’ll use a 15mm French star piping nozzle, if I am using crhaquelin, I’ll use a 15mm plain round nozzle. The ridges that the star nozzle create guidelines for the choux to follow as it expands in the oven, this helps it to rise evenly rather than crack at random. A star nozzle isn’t necessary when using craquelin and I prefer the look of a plain nozzle, but either will work! The 15mm nozzle will make the éclairs look tiny before baking but they puff up loads so don’t panic.
Freezing: This is a technique that can be handy if you find that your eclairs have very bulbous ends. Rather than piping individual eclairs , you pipe one long strip of choux pastry, freeze it and then cut it to size (I cut mine at 5”). You can then re-pipe and re-freeze the offcuts. I don’t generally find that this makes a huge amount of difference but I do have 10 years of piping experience under my belt, if you’re struggling to get your éclairs even there’s no harm in trying this out!
Starting again! It’s almost impossible to avoid piping a dodgy shape or getting a bubble in your piping bag at some point, if this happens just scrape it off and start again! There’s no point in baking an éclair that you know isn’t going to turn out right and there’s no reason it can’t re-piped. I do this loads, just use a bench scraper to pick it up off the tray and back into my bowl and go again until I’m happy with them!
Mats: I tested éclairs on almost every surface available to mankind, on baking paper, a silat mat, a greased tray, a perforated silpat mat, reusable greaseproof paper. The difference was negligible. A perforated silat mat probably produced the best results but it wasn’t anything groundbreaking, if you don’t have one I wouldn’t rush out to get one just for these, just use whichever you have to hand.


Toppings
Whatever you’re doing with the éclairs you’re going to want to add some kind of topping before baking. The reason for this is that having some kind of coating on our éclairs before baking controls the rise and cracking. Craquelin is most popular but I’ve come across loads of other options and tested them all, here are my thoughts:
Craquelin: This is a mixture on butter, sugar and flour that’s rolled out super thin, cut out and placed on top of the choux before baking. This works really well to control the rise and give the choux a lovely, even finish, it also adds a nice crunch. The only downside is that choux that’s been covered in craquelin isn’t the best for glazing, the craquelin can flake off into the glaze or absorb it, and of course it’s an extra step, however it’s virtually foolproof and can hide a lot of dodgy piping. If you’re new to choux I would definitely recommend using craquelin!
Fat: I’ve used cocoa butter, butter and baking spray on the outside of éclairs and found that they’ve all worked well! Baking spray is the fastest and easiest while cocoa butter is my personal favourite, I find the results with cocoa butter to be really nice and even with minimal cracking, you can either melt it and paint it on with a pastry brush or use mycryo (powdered cocoa butter) and dust it over using a sieve. Melted butter also works and is probably what most people would have to hand. If you’re struggling to brush it on without ruining the shape of your éclairs, freeze them for a few minutes before brushing on the melted butter/cocoa butter.
Egg: Egg wash adds a nice colour and gloss to choux pastry but is completely ineffectual when it comes to preventing cracking, I don’t really recommend it for éclairs.
Sugar: I’ve seen a lot of pastry chefs using a dusting of icing sugar or dextrose on éclairs before baking but it’s never really worked for me, admittedly, I’ve only tried sugar and not dextrose but for me it didn’t prevent cracking and the extra sugar browned the éclairs too soon meaning they got darker than I like. If you have dextrose, try it out but I’m reluctant to buy ingredients I’ll rarely use.
Chocolate: Since I’d had success with cocoa butter I thought I’d try a light shaving of chocolate. This worked surprisingly well and I would recommend this technique. My only problem was that, like sugar, it makes the éclairs brown faster so just keep an eye on them while they’re in the oven and drop the temperature if needed.
Anything small: Alright, I know anything small is a bit vague but what I’m trying to say here is that you can basically sprinkle the éclairs with anything you like before baking and it will help to maintain the shape, sesame seeds, poppy seeds, finely chopped nuts, grated cheese (for savoury choux) all work, I made some very lovely mini choux buns covered in everything bagel seasoning which I ate with cream cheese. This is a great way to add texture, it just makes the decoration slightly more difficult as you’re piping on/dipping an uneven surface.


Éclair Recipe
Makes 15
Choux
105g whole milk
105g water
1/2 tsp sugar
1/2 tsp salt
90g butter
160g strong flour/bread flour
200-300g eggs
Craquelin
50g caster sugar (for crunchier choux use demerara)
50g butter
50g plain flour
Method - Craquelin (if using)
Mix everything together until it forms a dough.
Split the craquelin in half and roll between two sheets of baking paper, roll it as thin as possible, the thinner the craquelin the smoother the choux will be.
Put on a tray and freeze until firm enough to cut.
Cut into rectangles the same size as your éclairs, mine were 5” long and the width of my ruler, freeze until ready to use.
This can be re-rolled indefinitely, I always end up with a bit extra that I freeze for next time.
Method - Choux
Combine the water, milk, butter, sugar and salt in a pan and bring to the boil.
Once boiling, reduce the temperature and add the flour stirring vigorously.
Continue to cook for about 2 minutes.
Remove from the heat and transfer into a stand mixer, beat with the paddle on slow until it’s partially cooled, it should be warm to the touch but not hot enough to cook the eggs.
Add the egg a bit at a time, beating until fully incorporated before adding more egg.
The amount of egg you need is dependant on a number of factors so you might need more or less, don’t add too much at once! When the mix drops off the spoon and forms a v shape it’s ready.
Chill in the fridge with clingfilm touching the top for at least an hour or overnight.
Pre-heat the oven to 180°C/360°F.
Transfer into a piping bag with a 15mm plain round nozzle (if using craquelin) or a 15mm French star nozzle.
Pipe 5” sticks with plenty of space in between.
If using craquelin, top with craquelin.
Alternatively, gently brush with melted butter or cocoa butter until completely covered.
Put in the oven and immediately reduce the temperature to 160°C/320°F.
Bake for 20-25 minutes, DO NOT OPEN THE OVEN DOOR.
When cooked, remove from the oven and immediately poke a small hole in the top, this will help any excess moisture escape.
Fill with whatever you like!


I really hope you find these tips and tricks useful! Éclairs can take some time to master so don’t worry if they’re not perfect on the first try, as ever if you have any questions leave me a comment or shoot me a dm.