


Ok, now we’ve got pastry, rolling and lining out of the way in Part 1, we can move on to different blind baking techniques and if you haven’t read Part 1 yet get your butt over there, these posts go hand in hand. I wanted to make this post as comprehensive as possible so buckle up, it’s another long one!
Classic Blind Baking
First up, classic blind baking, if you’ve ever blind baked before the likelihood is that you done it by scrunching up some baking paper, filling it with baking beans (or something similar) and baking. This is the most popular method for a reason, it works! The weight of the beans stops the base from puffing up as it bakes and steam forms beneath it as well as supporting the sides and stopping them from slumping down as the butter melts and the water evaporates meaning that the tart case holds its shape. Even though the general principals remain the same there are still quite a few variables when using this method so let’s get into them.
The Paper
Almost all recipes call for baking paper/parchment (I never really know the difference) but there are some alternatives. In the past I’ve used clingfilm to blind bake with, in order to stop it from melting you need to use several layers, the advantage of this over baking paper is that its more pliable meaning you get a slightly smoother result than baking paper but I decided to omit it from my experiments, it’s not made to be heated up and the thought of ingesting melted plastic isn’t great. I found differing opinions online about wether or not it’s ok to use, some people say it’s fine, some say it’s carcinogenic so I’m going to err on the side of caution and say it’s a no from me. Aside from that, after it’s been used to blind bake with once, the clingfilm is unusable, shrivelling up and melting in places. I prefer something that can be re-used at least a couple of times!
Next up, foil. Foil is ok, it works but I wouldn’t really recommend it, I find that even with greasing the pastry is more likely to stick to it and the likelihood of damaging your tart case is much higher. I also find that because it’s quite firm, it makes bigger indentations in your pastry, this isn’t the end of the world but we’re aiming for perfection here, we want our tart cases to be as smooth and even as possible.
For me baking paper is perfect, the trick to using it is to scrunch it up several times (unless you’re using the cut paper method, more on this later), this makes it more flexible and gives us a smoother surface, paper that isn’t properly scrunched will leave indentations in the pastry and you’ll end up with some gaps between the paper and pastry which we want to avoid. When lining the tart with the paper it’s really important to make sure it’s completely in the corners and touching every single surface, if there’s gaps for the pastry to slump into, it probably will and this is when you get shrinkage. We don’t want to give the pastry any wiggle room!
The Beans
Once the paper is in the tart case, we need to fill it with something to weigh it down, I’ve seen all sorts of things used for this! The most popular are ceramic baking beans, these work and are fine, however they’re on the expensive side and if we’re filling a large tart all the way to the top or making multiple tarts at once you’re going to need a lot!
I’ve seen Jamie Oliver use coins to blind bake with. The logic here is that because they conduct heat, they speed up the process. However I’m not a fan of this for a few reasons. Firstly I prefer to use something a bit smaller and finer so it can get into all the crevices and hold the pastry up, coins would leave quite a few gaps and they absolutely would not work for small, individual tarts. Secondly it doesn’t feel super hygienic, who knows where all of those coins have been!? Of course you could wash them but this seems like unnecessary faff. Finally I just don’t have that many coins hanging around, overall it’s just not practical.
I’ve also seen it done with sugar, sugar works well because it gets into every corner and distributes the weight perfectly. However as it bakes the sugar may start to slightly caramelise, this isn’t really a problem and I have recipes that call for lightly toasted sugar but since I do a lot of recipe testing I need to make sure the sugar that I’m using is the same every time. If you want to try out lightly toasted sugar give this a go and hit two birds with one stone!
I find the easiest and cheapest to be pretty much any dried grain or pulse, lentils, rice, beans all work, I use rice because it’s the cheapest, you can’t use it to cook with afterwards so I just keep mine in a dedicated blind baking rice tub.
Trimming
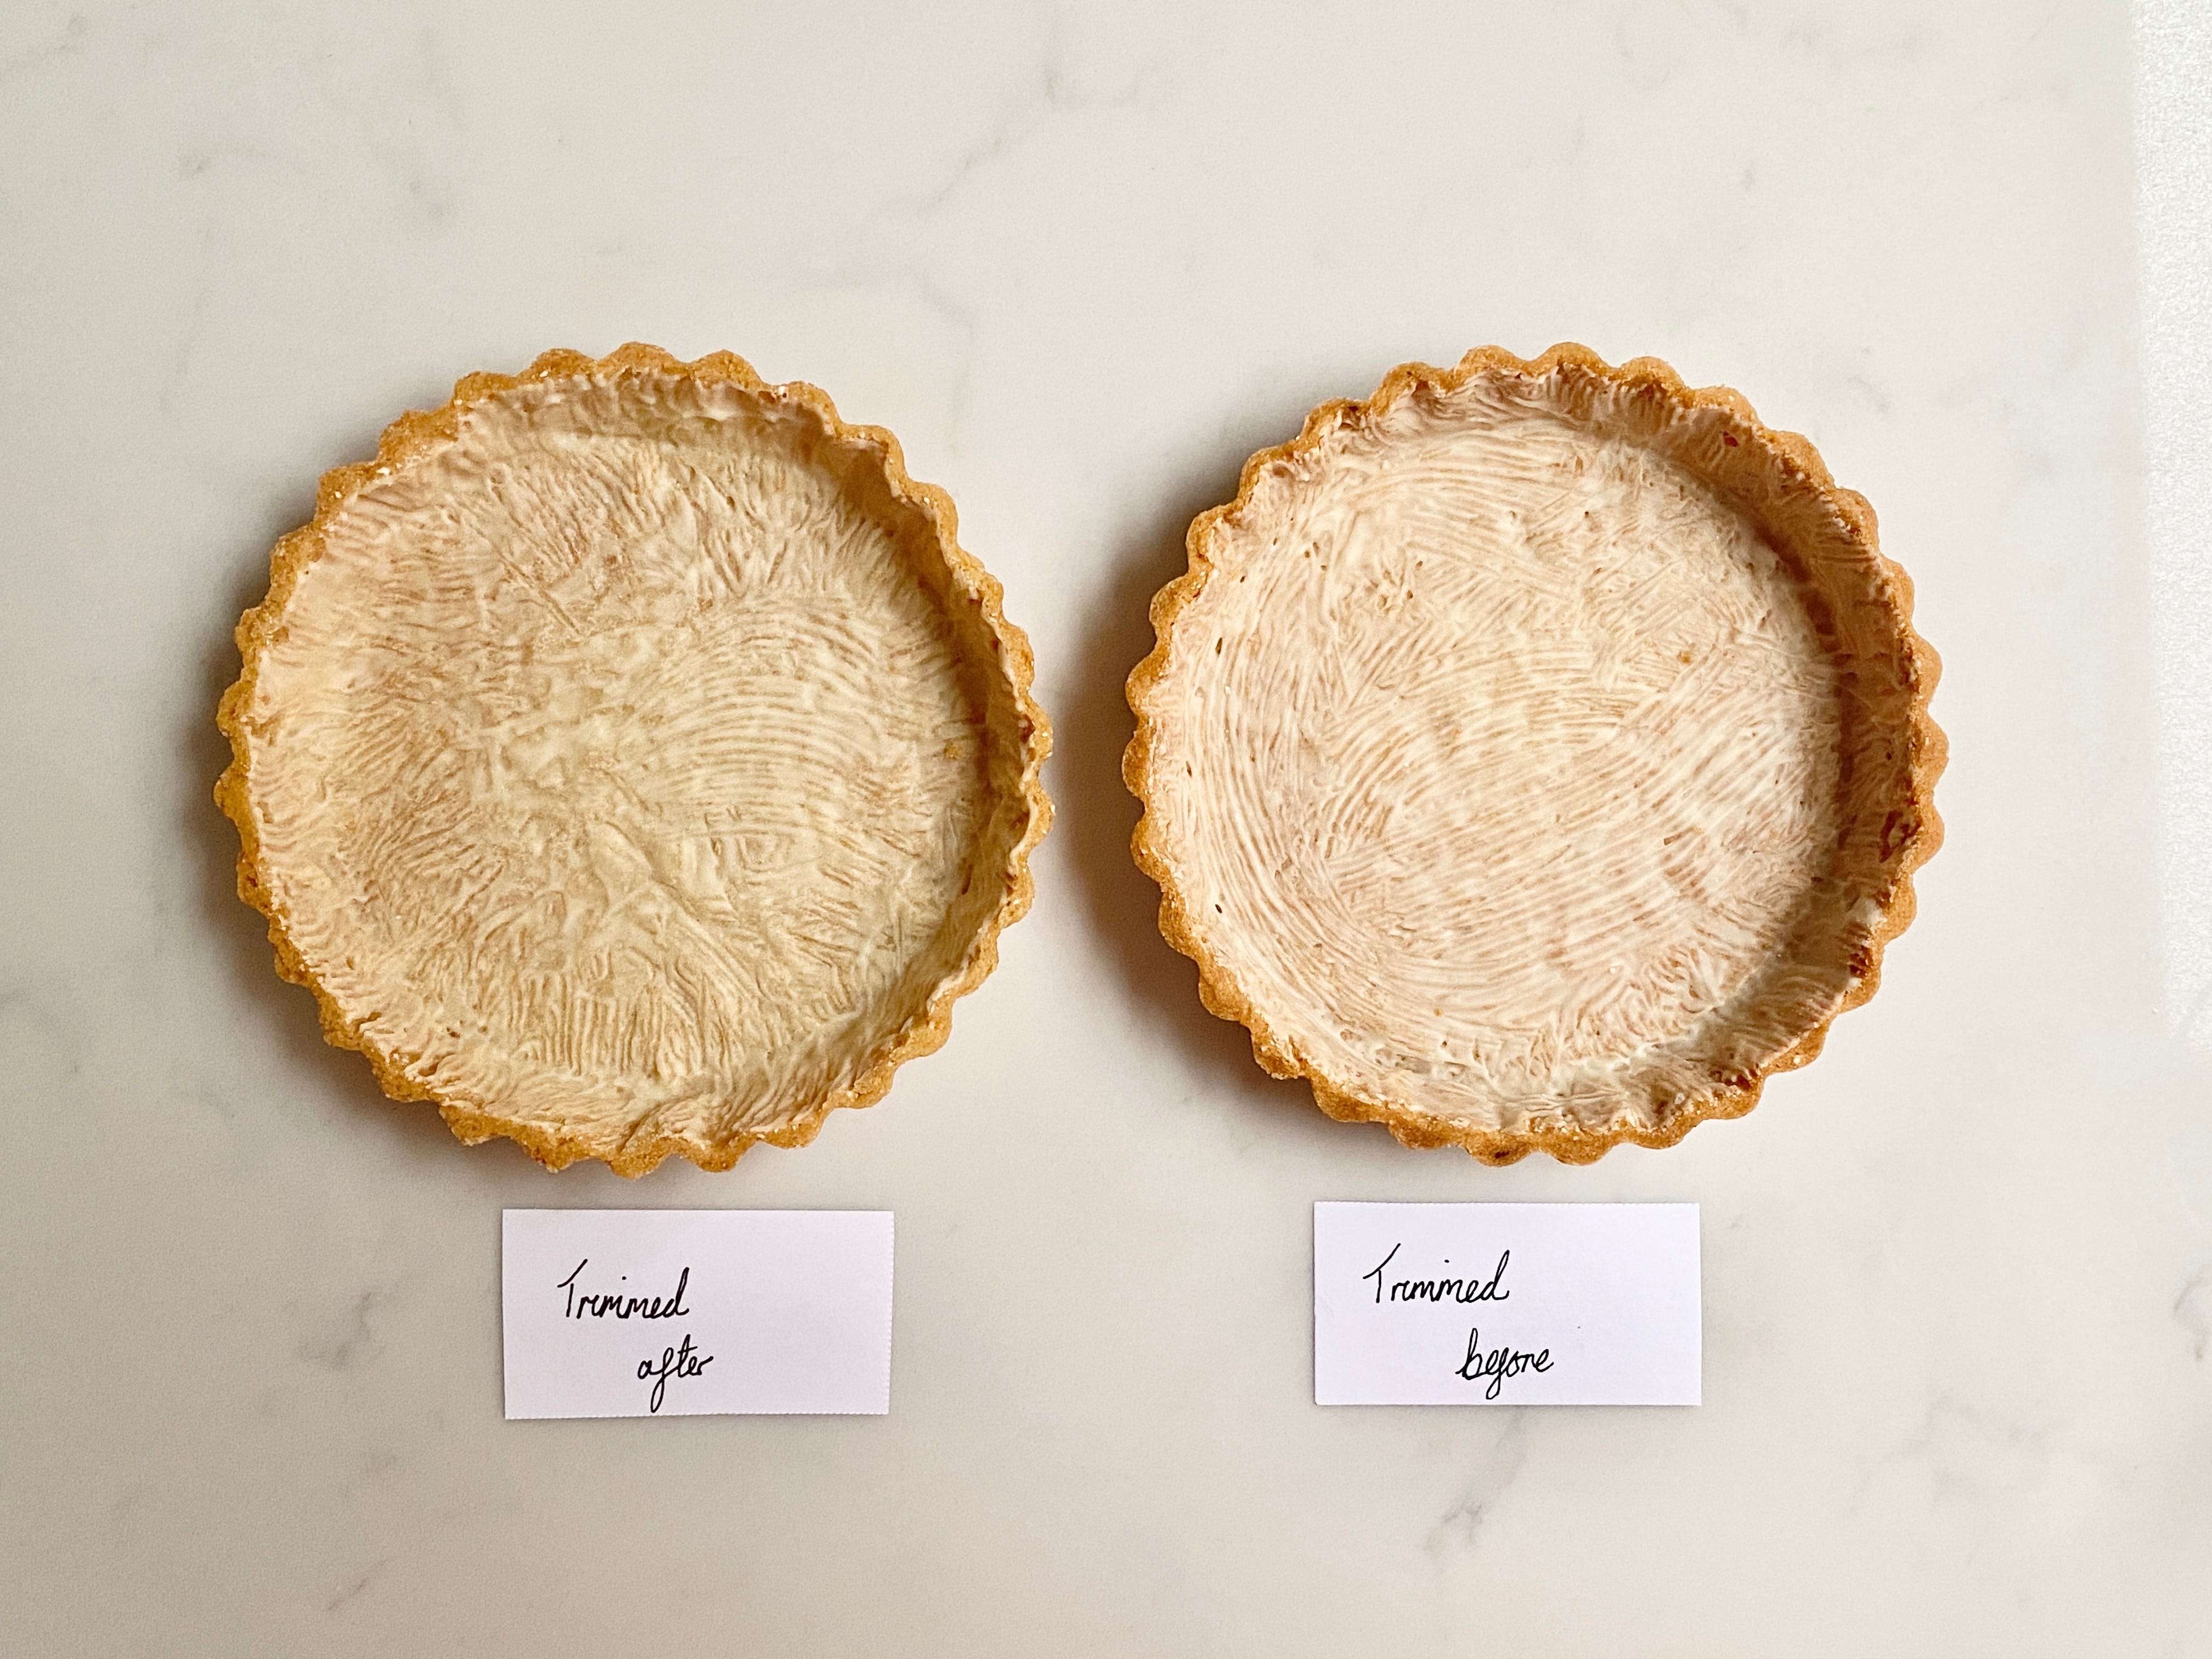
Before moving onto the baking method we need to address the age old question of when to trim the pastry. Leaving excess pastry around the rim of your tart is a good method if you really struggle with shrinkage, the extra pastry allows some wiggle room so that even if it does shrink it shouldn’t end up below the surface of your tart case. Once baked you’re left with an uneven top that can then be tidied up by shaving off the extra with a vegetable peeler or sharp knife resulting in a very even pastry case that is completely flush with the tin. The risk here is that the tart case breaks during the trimming process, if this happens there’s not really much you can do to fix it, to avoid breakage allow the tart to completely cool before trimming, once the fat has set it’s a bit more sturdy. My preference for this will always be a sharp vegetable peeler, you just need to use a light touch and take your time, only shave a small amount off at once! Overall I’d recommend this method for thick tart cases, the risk of breakage is just too high when the pastry is really thin.

The alternative is to trim the pastry before it goes into the oven. This can result in slightly more shrinkage but if you’ve got every step of the lining and blind baking process right then there shouldn’t be much if any shrinkage. the advantage of doing it this way is that there’s no faffing about once it comes out of the oven and you can save the trimmings of pastry to re-roll and avoid any wastage.
Everyone has a different opinion on this and I really think there’s no right or wrong answer, as you can see below, the difference between my test tarts is negligible, you can hardly distinguish one from the other. I’d suggest playing around with both options and just doing whichever you prefer!
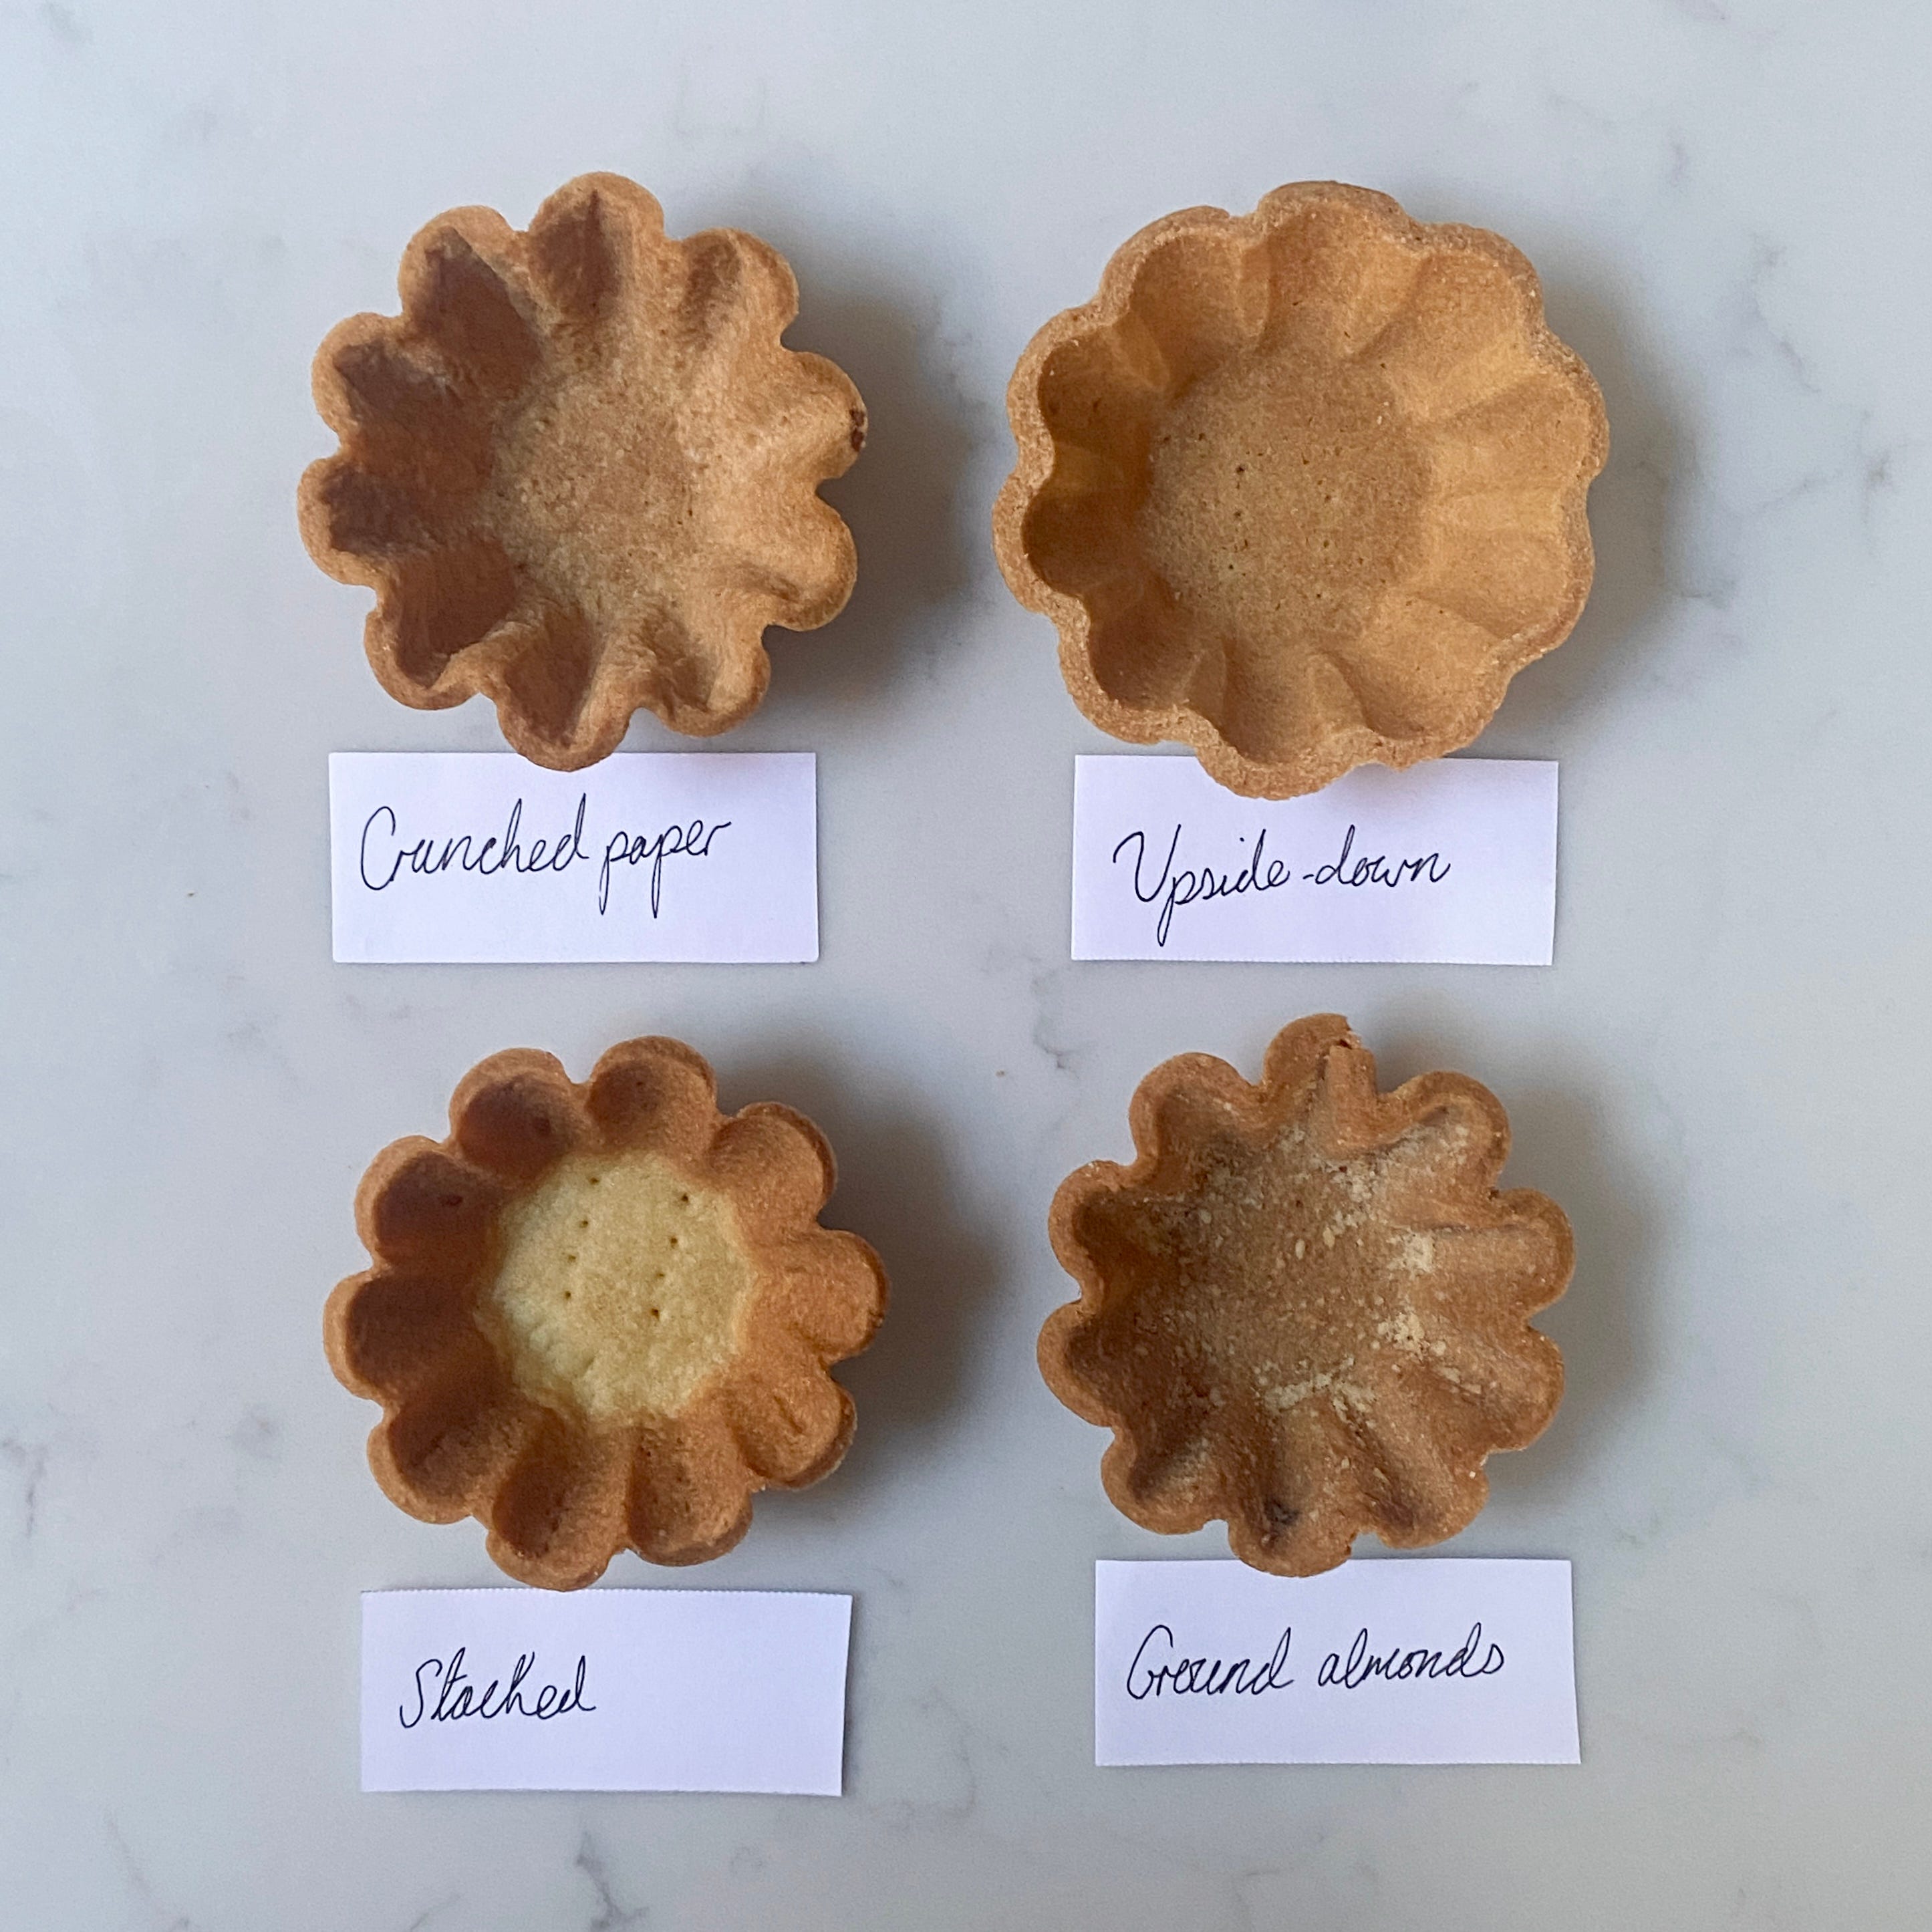
Method 1 - Scrunched Paper
Now, onto the method, this is just a rough guide, baking times and temperatures will vary but this is a good starting point.
Cut a disc of paper about 3cm larger than your tart case.
Scrunch it, un-scrunch it and scrunch again until it’s nice and flexible.
Press right into the corners of the tart case, the pastry needs to be properly chilled at this point or it could get damaged!
Fill with baking rice or beans, they need to come right to the top of the pastry to avoid shrinkage, press the rice in to make sure there are no gaps.
Bake at 170°C, different sizes will take different amounts of time. My large tart required 25 minutes, my small tarts 20 minutes.
Set aside to cool for a few minutes, then remove the paper and rice, the pastry should be completely set but will still be pale (if it isn’t cooked yet add the paper and rice back in and cook for an additional 5-10 minutes).
Return to the oven and bake for 5-10 minutes until the whole pastry case is golden.
Remove and allow to cool, you should now have the perfect tart case!


Cut Paper
If you’re making a tart in a ring with straight, vertical sides, rather than scrunching the paper you can cut it into a disc for the base and strips for the sides, this is a bit more effort but does result in a lovely smooth tart as there’s no texture to transfer to the inside of the tart. If you make tarts regularly and don’t want the hassle of cutting discs and strips every time this also works with re-usable baking sheets or toaster bags! There’s no noticeable difference in results, it just saves you time next time you want to blind bake.
The downside of this method is that because you can’t lift the rice out in the same way as you would with the scrunched paper method, it can be a bit more risky as to remove the rice you have to wait for the tart to cool down, scoop out as much rice as possible before turning the tart upside down. This can be pretty scary and for this reason I prefer to use this method for small tarts rather than big ones. So how to do it;
Method
Cut a disc of paper a few millimetres smaller than your ring and some strips of paper about 0.5cm taller than the edge of your pastry.
Line the pastry with the paper, make sure there’s no gap as the rice will stick to the pastry if it touches it.
Fill with baking rice/beans.
Follow baking instructions as above.
When it comes to removing the paper, it can get stuck along with a few grains of rice, if this happens, don’t panic, just use a small paring knife to scrape them out!


As you can see the cut paper results in a much smoother interior than the scrunched paper, however it’s worth remembering that this is the inside of the tart and no ones going to see it! Even though the difference in the empty tart cases is quite noticeable, one the tarts are filled it’s almost impossible to tell which is which! Again, just do whichever method you prefer, I tend to use the cut paper method for small tarts, the scrunched for large.
Trouble Shooting
One of the biggest lessons I’ve learnt in my career is that things can almost always be salvaged! So don’t worry if something goes wrong, we can probably fix it and if not never mind, it’s only pastry after all.
The most common thing that goes wrong during the bake is that holes will form, especially when using tart rings, if the pastry doesn’t have a big enough overlap it will pull away and you’ll be left with a gap. This can easily be fixed! After the fist bake, after you’ve removed the baking rice and paper and holes in the pastry can be patched up with a bit of raw dough, just press in on and smooth it out before putting the tart cases back in the oven for the final part of the blind bake. The pastry that’s filling the gaps won’t become the same golden brown as the rest but we need to remember that this is the inside of the tart so no one will see! And it means that you can add any filling in without the worry of it spurting out of a random hole.


That wraps up classic blind baking and now we can move onto some other methods!
Upside-Down Lining & Baking
I LOVE this method! It’s so much faster and easier than traditional methods of lining and blind baking plus it requires no faffing about with baking beans, parchment paper or taking things in and out of the oven. Because the tarts are lined and baked upside-down we’re working WITH gravity rather than against it which makes life so much easier and means that there is zero shrinkage (as long as you use the right pastry).
There are a few things that we need to take into consideration when using this method, the first is pastry. Upside-down lining simply does not work with dry, crumbly pastry like sablé pastry or a lot of chocolate pastries, it needs enough flexibility to comfortably drape over the outside of the tin without cracking. It also doesn’t work with any pastry that is likely to puff up like flakey or puff pastry, there’s nothing to weigh it down so you’ll just end up with a poofey mess.
I also find that this method can be temperamental with really deep tarts, the additional weight of the pastry on the sides can cause it to rip and slide down the edges as it bakes. I’d say that it’s safest not to go any deeper than 2cm to avoid this. You don’t need to use the tins I’m using, any small tart tins or even muffin trays work, if in doubt, start with very shallow tarts with only about 1cm of pastry overhang.
Finally, the upside-down method is not suitable for tarts that need to be baked again. Once they’re blind baked they must be removed from the tin and as such they have little to no support when re-baking which means that when they’re put back in the oven the weight of the filling is too much and the pastry cases collapse. This isn’t always the case and I have made some small baked chocolate tarts this way, I’d say about 10% broke during the second bake, so if you don’t mind losing a few and using them as taste testers then you can risk it.
Overall this is a perfect method for individual tarts that will be filled once baked, I use this method for things like fruit tarts, banoffee pie and ganache tarts. So let’s get going.
Method
Roll your pastry and cut into discs 1-2cm larger than the base of your tins, this can be quite hard to gauge so it’s best to check your sizing by laying it on top of a tin before cutting all of your discs.
Place the pastry over the top of your tin as centrally as possible, slowly and gently press the edges down until it’s evenly draped over the tin, if your tin has indentations, use a chopstick to press the pastry in.
Prick the top of the pastry with a form, this will help to stop any air bubbles forming,
Rest for at least half an hour.
Bake at 170°C, for 10 minutes.
Some of the tart cases will probably have puffed up a bit, press down with a spatula, this get’s rid of any air bubbles and ensures that our tarts will sit flat!
Bake for a further 5-10 minutes, different sizes will take different amounts of time, my small tarts took 20 minutes overall.
Remove your tarts while they’re still warm, the pastry is more flexible when warm and they come off easier when the fat in the pastry is still hot. If you forget to remove them while they’re warm, you can just put them back in the oven for another 2-3 minutes.


Stacked Tins
Similarly to the upside down method, this is a really quick and easy way of blind baking tarts, the only thing is that it requires double the amount of tins! Your tart tins also need to be stackable with very little to no space between each tin, otherwise the tin wont reach the base of your pastry and it will puff up, even in tins that do stack perfectly this can happen so that’s something to look out for.
Method
Line half of your tart tins, keeping your pastry nice and thin trimming any excess.
Grease the bases of the remaining tart tins.
Press the greased tin into the lined tin, depending on the weight of your tins you might want to add some additional weight in the form of baking beans or rice, my tins are quite heavy so this wasn’t necessary.
Chill for at least 30 minutes.
Bake at 170°C for 10-15 minutes, these tend to bake slightly faster than traditional blind baking as the metal of the tin conducts heat.


As you can see this works pretty well, the only downside is that sometimes the base puffs up slightly and doesn’t quite bake at the same rate as the sides, however it is still baked and crunchy and so long as no one’s inspecting the bases of our tarts we should get away with it!
Perforated Tins
I wanted to give perforated tart rings a brief shout out because they can make your life a lot easier! The perforations in these rings allows for better airflow and for the steam to escape meaning that you get an incredibly even bake, if you use them in conjunction with a perforated baking mat or tray you don’t have to bother with any of the paper, baking beans, nothing, the steam releases from the bottom meaning it doesn’t puff up and the pastry grips the sides of the ring. You just line the tart, chill it and stick it in the oven. I’ve used these in the past and they do work well, however you really need to invest in good quality rings like these de Buyer ones and at nearly £18 each for a SMALL tart ring it’s a lot, and that’s not including the mats/trays. For this reason I didn’t test this method at home, I’m really trying not to buy equipment that I don’t need, if you have some cash to splash and want to make your life easier I know loads of people swear by these tins but I think you can get just as good results with any old tart tin!
Ground Almonds
The last method I’ll be covering! I saw someone on instagram do this (sorry I can’t remember who!) and thought it seemed like an interesting method that I should try out. This method is basically the same as classic blind baking only instead of lining the tart case with paper first you just fill it with ground almonds before baking, thus saving the effort of messing about with paper. Of course you can only use this method if your pastry already contains almonds although I suppose it would also work with caster sugar. I wasn’t a huge fan of this method, any time i saved by not messing about with the paper was later spent trying to get all of the ground almonds out of the baked pastry cases, of course some are ok but I don’t want a mouthful of ground almonds instead of tart filling.
Post-Bake
Just when I thought I was finished I realised that I still have more to add! A common problem that can be easily fixed post-bake is a wobbly edge, this can be fixed by shaving of the excess with a peeler, fine grater or even a sieve! My preference is a fine grater or microplane, we just want to shave a tiny bit off the edges to even it out, a gentle touch is key to avoid a crushed tart case!


Now onto anti-sog precautions! These aren’t always necessary, tarts with a firm or cakey filling e.g. frangipan aren’t prone to getting soggy or if you plan on eating your tart the same day you can skip this step, however if you want to make your tart last a few days and keep it’s crunch then here are a few tips! If you plan on using a very liquidy filling it’s a good idea to create a fat based barrier between the filling and pastry, fat is hydrophobic meaning that it repels water, thus protecting our lovely crisp pastry from any liquid that might cause it to soften.
The barrier I choose depends on if the tart will be baked again. If the tart is going to be baked with a filling e.g. custard tart I seal the pastry with an egg wash, just combine an egg yolk with a splash of milk, mix and paint all over the inside of the tart shell, bake for 5 minutes to cook the egg before adding the filling and baking as necessary.
If the tart won’t be baked again I like to opt for a sog repellant in the form of chocolate, the easiest way is to throw a few chocolate chips into the tart case while it’s still hot from being in the oven, wait a minute and then use a pastry brush to paint an even layer of chocolate all over the inside of the tart shell. Use whichever chocolate makes sense for the flavours of your final tart, if you don’t want any flavour to come through you can use deodorised coconut oil or cocoa butter instead.


Onto storage, baked, unfilled tart shells can be stored in an airtight container for up to two weeks, I have some sitting in my cupboard that I made ten days ago and they’re as good as new!
Final Thoughts
What a ride, my brain has been replaced by a huge ball of dough after several weeks of pondering over pastry. All I can say if I really hope you find this useful, I set out to write everything I’d ever learnt about blind baking and in the process learnt even more and I’m sure I’ve got more to learn, perhaps part 3 will be necessary someday! If you’ve struggled with blind baking in the past I really hope that these posts have helped clear a few things up and please tag me in any of your blind baking endeavours.

Can you use muffin tins for the upside down method?
These tips are great as I make a lot of lemon pie and will be using these tips for future pies and tarts :)
Thank you!
thank you so much for making these deep dives free! I made my first ever tart last week and this post was really helpful :)